Before following these instructions… PLEASE backup your machine. The best way to get a good backup of a machine is to do an export. So please, export the machine or at the very least test your backup procedures to make sure they are valid. Also, if you want a way to do this through a GUI then check out the
video and go to the end. Very cool shortcut that is much easier than the command prompt but requires Windows 2008 R2
If you’re having trouble viewing the video, Click here to download it.
I ran this on a Windows Server 2008 R2 SP1 machine. These instructions will be identical for Windows 7. I am not certain of the changes from earlier versions of the OS. I think these commands are all available in Vista but I am not sure and I do not have a vista machine available for testing. The commands in this post must be run while the VHD file is closed. It cannot be attached with disk manager and it cannot be attached to a running VM. You also have to be in an elevated command prompt. Start | type cmd | Right-click cmd (top of menu) | Run as Administrator
I have done several posts recently on managing VHD’s. I wanted to simplify the process of adding additional space to the C: drive (Boot Drive) of a virtual machine. I have collapsed it down to a few simple steps using diskpart. Thanks to all that posted comments giving me the suggestion to write this post. If you have snapshots on the volume or are using differencing disks you will need to check out How To Merge a Chained Differential VHD Disk So It Can Be Extended and Expanded to learn what you need to do before you can expand and extend these disks.
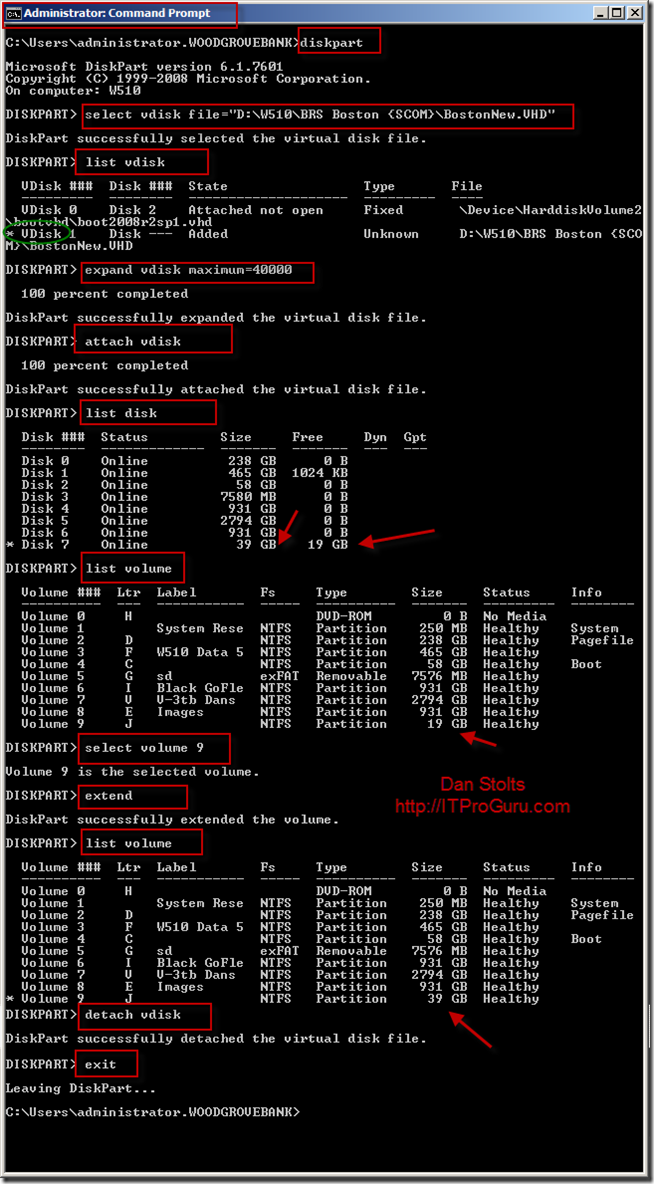
The commands I ran to expand and extend my disk (all together). Notice your commands will be different as you will have to put in your name and path and look to see what volume # your disk is so you are working with the correct volume. A couple things of note as I worked through these instructions again and produced a video of it. The most important of which is that the disk has to be completely closed before you can start the machine up.
I did a video walkthrough of these instructions. You can down the video from Expand and Extend VHD.vmv
diskpart
Select vdisk file=”D:W510BRS Fargo – {SQL, FEP Server ConfigMgr } .10BRS-FargoNew.vhd”
list vdisk
expand vdisk maximum=40000
attach vdisk
list disk
— If disk is not online… Use “Online Disk” to bring it online
list volume
select volume 9
extend
list volume
detach vdisk
exit
Now let’s look in more detail at what I am doing with each command…
Command Description diskpart Launch the DiskPart utility Select vdisk file=”D:W510BRS Fargo – {SQL, FEP Server ConfigMgr } .10BRS-FargoNew.vhd” Select the VHD file. Notice that if the path or the file name has spaces you have to put “” quotes around it list vdisk Shows you a list of Vdisks. The * at the left shows the one that is selected. expand vdisk maximum=40000 changes the size of the vdisk to this new size defined by the maximum= parameter. This is the number of bytes that the resulting disk should have in it. 40000 is almost 40gb. attach vdisk once the disk is expanded you have to mount it to work on the disk. This actually mounts the disk. If you look in Disk Manager or in windows explorer you would see that after you run this you have a new drive. It is doing the Attach to the currently selected vdisk which is the one we just expanded list disk Shows the list of disks. This is all mounted disks so it includes all vDisks that are mounted. The disk we want to work with is already selected because we just attached it. if it were not selected you could select it with Select Disk #. Notice that we now have 19gb of free space thanks to the expand vdisk command we ran above Online Disk If disk is not showing online. you will need to bring it online. list volume List volumes (partitions) the ### column is the most important. It has the number you need to use to select the volume you will work with. notice that the volume is currently 19gb select volume 9 Select the volume we want to work with. In my case the volume I want to work with is Volume 9 extend extends the currently selected volume to use all contiguous available space on the same disk List Volume running again to show the new size of 39gb. When we ran it before, it was only 19gb. detach vdisk dismounts the Vdisk volume. Taking the volume offline is required because Hyper-V cannot load a disk that is mounted exit Exit diskpart utility
And finally, a screenshot of what I typed and the result.
Other articles that may be of interest:

